SAP Fiori Deployment Using CTMS with CI/CD on SAP BTP — A Complete Step-by-Step Guide
SAP FIORI DEPLOYMENT USING CTMS WITH CI/CD A Complete Step-by-Step Guide for BTP Cloud Foundry Updated for 2026 • SAP BTP • Cloud Transport Management • DevOps |
Last Updated | May 2026 |
Audience | BTP Developers, DevOps Engineers, SAP Basis Consultants |
Covers | CTMS Setup, Transport Landscape, CI/CD Pipeline, MTA Build & Deploy |
SAP Products | SAP BTP, SAP Fiori, SAP Cloud Transport Management (CTMS), SAP CI/CD Service |
Introduction
If you have been building custom SAP Fiori applications on SAP Business Technology Platform (BTP) and deploying them by directly logging into a sub-account via VS Code or SAP Business Application Studio (BAS), you are already doing well. But as your team and landscape grow, that approach starts to show cracks — it is manual, hard to audit, and difficult to control.
That is exactly where SAP Cloud Transport Management Service (CTMS) steps in. Think of it as the air traffic control tower for your software changes. Instead of developers directly landing their code wherever they like, everything moves through a structured, monitored, and auditable transport pipeline — from Development to QA to Production.
This guide walks you through transitioning from a manual CF-login-based deployment to a proper enterprise-grade CI/CD pipeline that uses CTMS. Whether you are a beginner setting this up for the first time or an experienced developer refreshing your knowledge for 2026, this guide is built for you.
💡 What is CTMS? SAP Cloud Transport Management Service (CTMS) is a cloud-native service on SAP BTP that enables controlled, auditable transport of software artifacts — such as Fiori apps (MTA archives), SAP Integration Suite content, and more — across multiple BTP sub-accounts (Dev → QA → Prod). |
Why Move to CTMS? The Case for Controlled Transport
Before diving into steps, it is worth understanding why your team made the right call adopting CTMS. Here is what changes for the better:
Problems with Manual CF-Based Deployment
- No audit trail: Anyone with a CF login could deploy anything to production. Who deployed what, when?
- No transport governance: Developers can accidentally overwrite each other’s changes.
- Environment drift: QA and Prod can easily get out of sync with what was actually tested.
- No approval gates: Nothing stops an untested change from going straight to production.
- Hard to roll back: Without a transport record, reverting to a previous version is painful.
Benefits of CTMS with CI/CD
- Complete audit trail: Every transport is logged — who triggered it, when, and to which environment.
- Separation of concerns: Developers trigger the build; a Release Manager controls the import to Prod.
- Automated pipeline: Code push → build → package → transport queue, all without manual CF commands.
- Consistent deployments: The same MTAR artifact that was tested in QA is what goes to Prod — no surprises.
- Multi-account support: CTMS works across different global accounts and even data centers.
- Integration with SAP Cloud ALM: Full change and release management visibility.
Key Concepts You Need to Know
Before touching any BTP cockpit, make sure these terms are clear in your mind. They will appear throughout every step.
Term | What It Means |
MTA (Multi-Target Application) | A deployment unit that packages your Fiori app, services, and dependencies into a single deployable project. |
MTAR (.mtar file) | The compiled, archive version of your MTA project — like a ZIP file ready for deployment. This is what CTMS transports. |
mta.yaml | The manifest file in your project that defines modules, resources, and dependencies. Think of it as the recipe. |
Transport Node | Represents a target environment (sub-account + space) in CTMS. You will have nodes for DEV, QA, and PROD. |
Transport Route | Defines the allowed flow of transports between nodes — e.g., DEV → QA → PROD. |
Transport Landscape | The full picture of your nodes and routes. CTMS has a Landscape Wizard to set this up visually. |
Import Queue | Every node has a queue. When a transport arrives, it waits here until a Release Manager imports it. |
Service Key | Credentials for your CTMS service instance. The CI/CD pipeline uses this to authenticate and upload artifacts. |
Destination | A BTP Destination object that tells CTMS how to connect and deploy to a target sub-account. |
SAP CI/CD Service | SAP's hosted Continuous Integration & Delivery service on BTP, with built-in CTMS integration. |
Prerequisites — What You Need Before You Start
Check off everything on this list before following the setup steps. Missing any one of these will cause you to get stuck midway.
BTP Account & Sub-accounts
- A BTP Global Account with administrative access.
- At least three sub-accounts: DEV, QA, and PROD — each with their own Cloud Foundry environment, org, and space.
- A dedicated sub-account for CTMS (strongly recommended). This keeps CTMS isolated from your workloads.
Entitlements Required
- Cloud Transport Management — Standard plan (or Free Tier for evaluation).
- Continuous Integration & Delivery — Standard plan (if using SAP’s CI/CD service).
- Cloud Foundry Runtime — Available in each sub-account.
- HTML5 Application Repository — For Fiori app hosting.
- Destination Service — In each sub-account.
Tools & Access
- Access to your Git repository (GitHub, GitLab, Azure DevOps, or SAP BTP Git).
- Your Fiori project must be structured as an MTA project with a valid `mta.yaml` file.
- Global account admin or sub-account admin role in BTP Cockpit.
- The CF CLI (`cf`) installed locally is helpful for troubleshooting, though not required for CI/CD.
⚠️ Important Note: If your Fiori app was originally built as a standalone SAPUI5 project (not MTA), you will need to convert it to an MTA project first. In SAP BAS, right-click your project folder and choose 'Add MTA Descriptor'. VS Code users can use the SAP MTA extension. |
Understanding the End-to-End Architecture
Before we touch a single setting, let us understand the full picture of what we are building. A clear mental model now will save you hours of confusion later.
How It All Flows Together
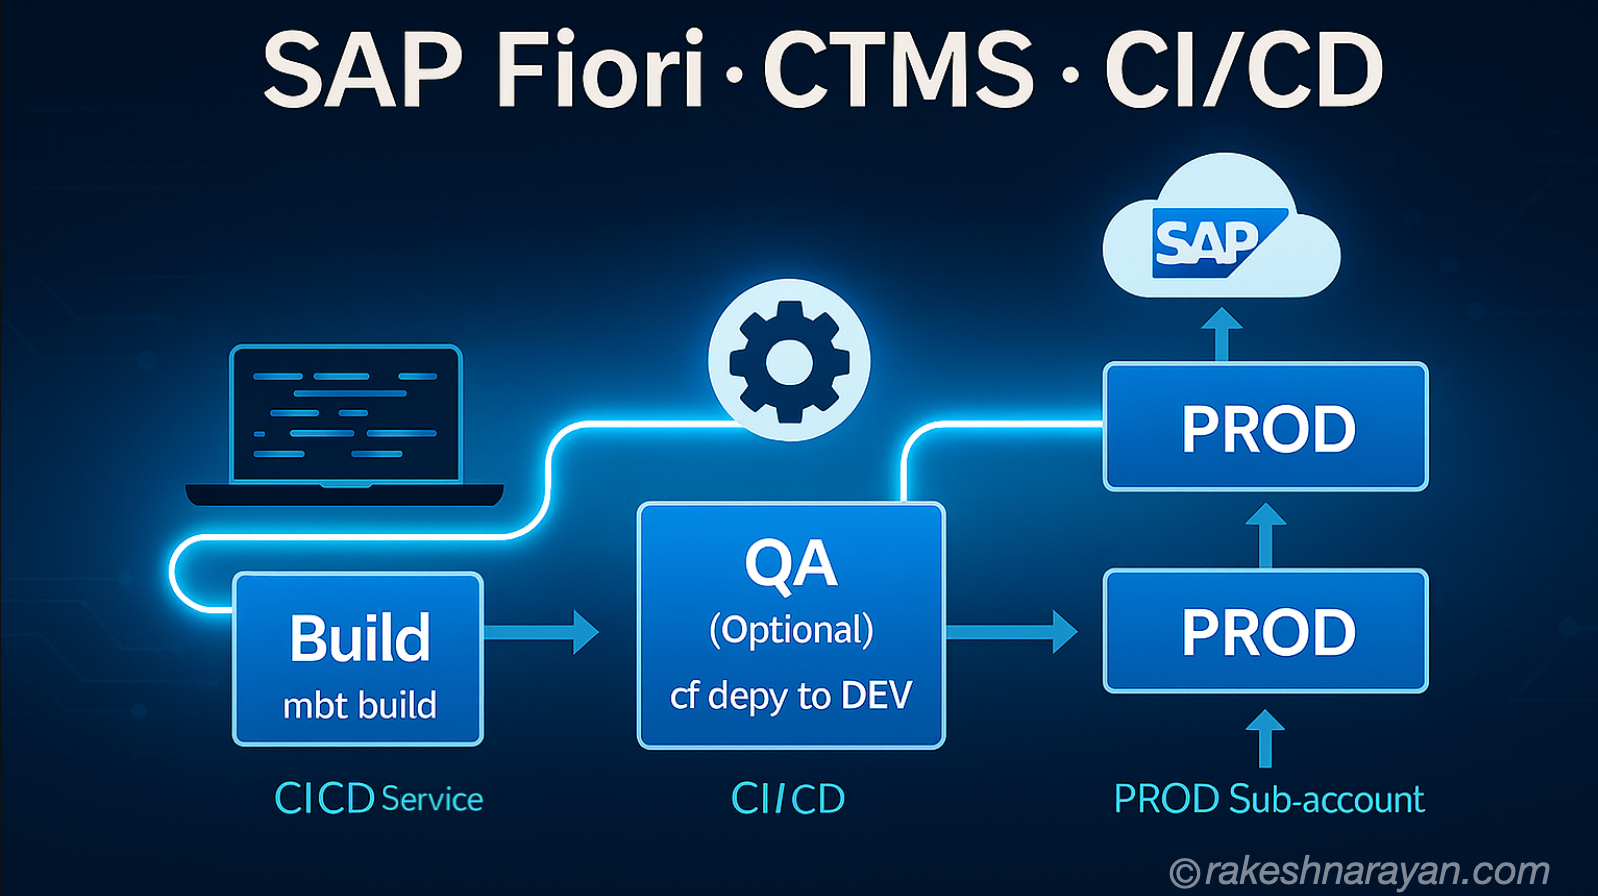
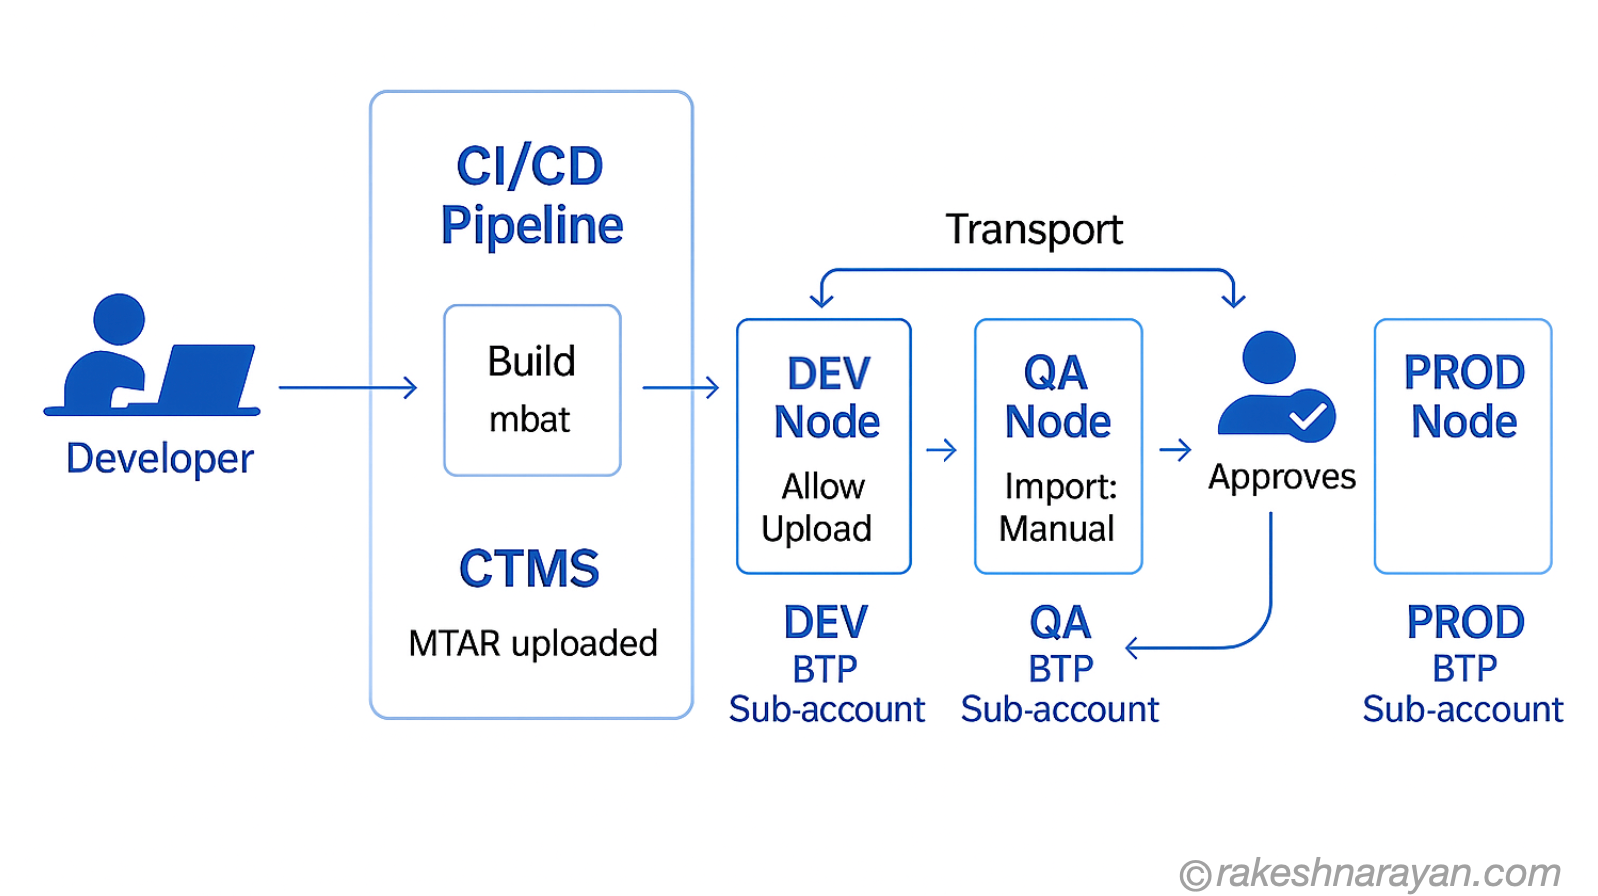
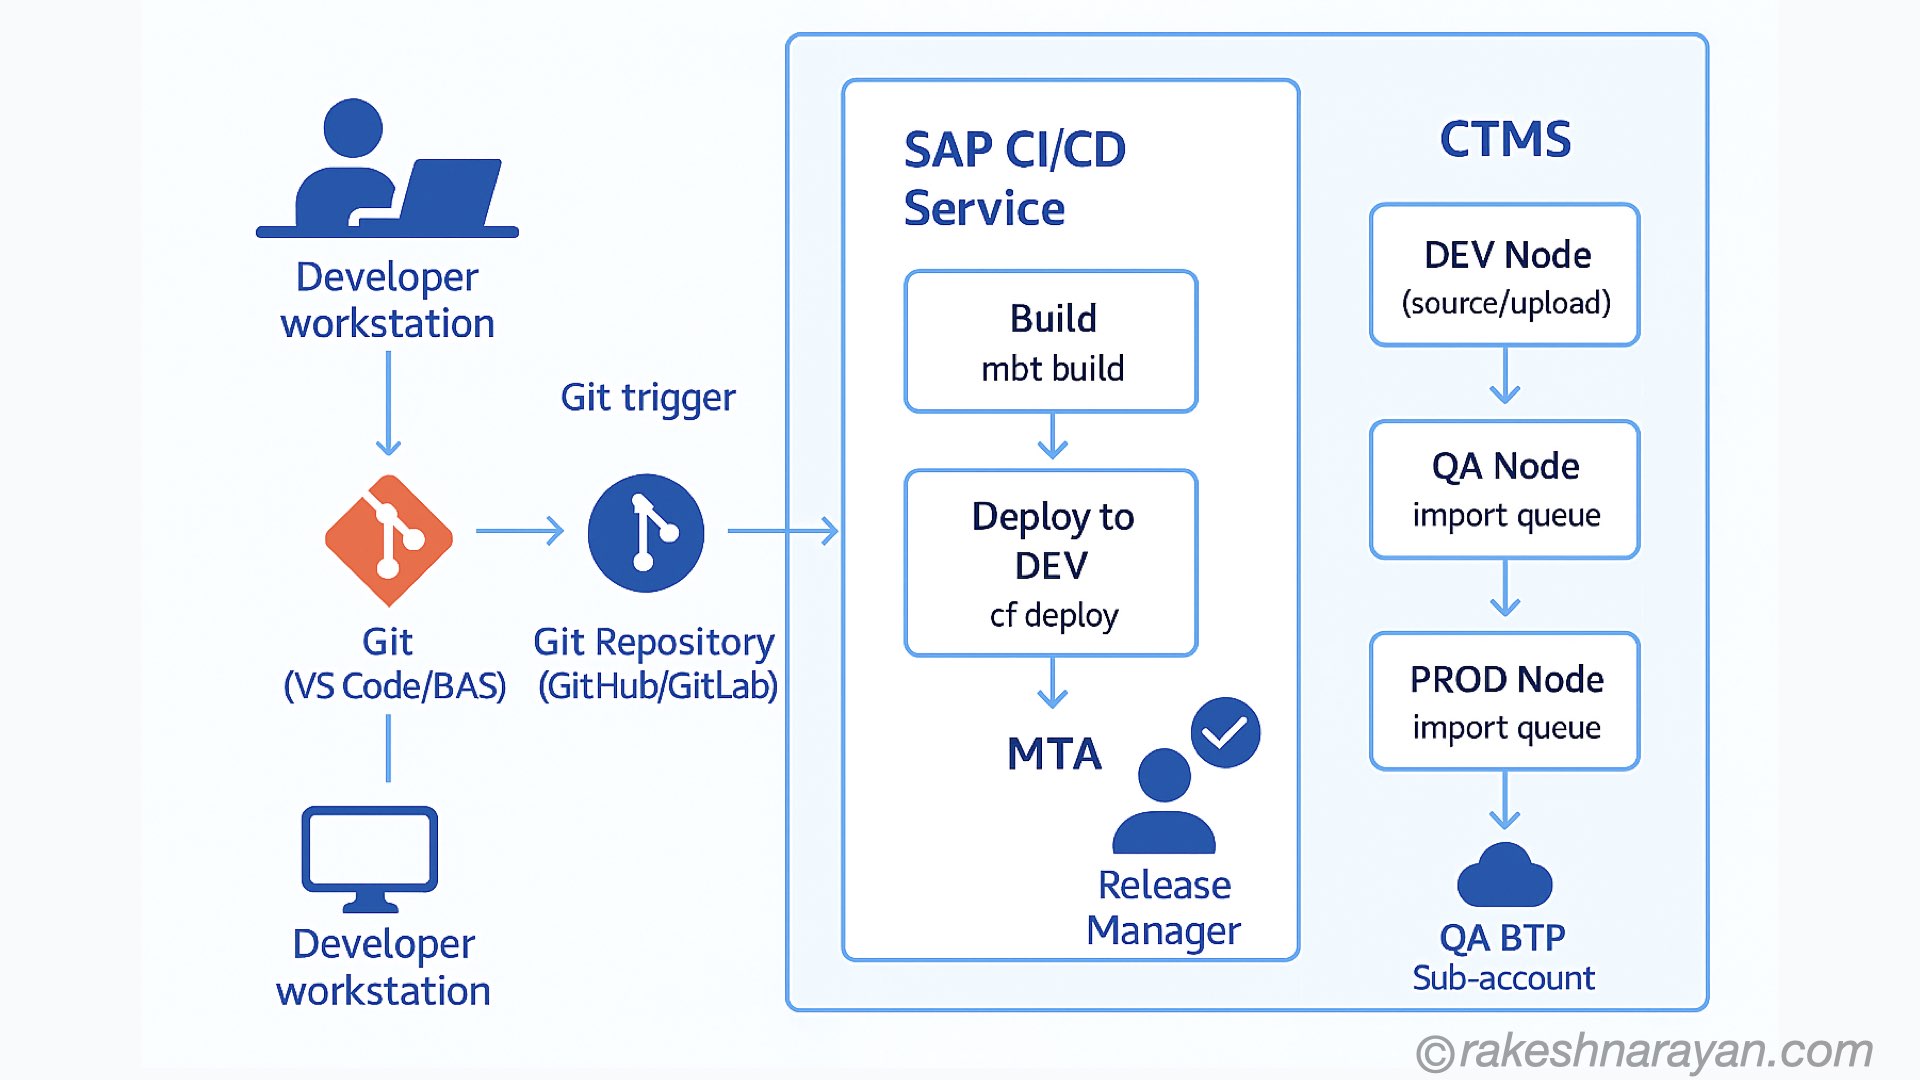
- A developer completes a feature and pushes code to the Git repository.
- The push triggers the SAP CI/CD Service (via a webhook).
- The CI/CD pipeline runs: it builds the MTA project using the Cloud MTA Build Tool (MBT), creating an `.mtar` file.
- The pipeline deploys the `.mtar` to the DEV sub-account directly (CI/CD handles this).
- Simultaneously, the pipeline uploads the `.mtar` to CTMS, placing it in the QA import queue.
- A Release Manager logs into the CTMS UI and triggers the import to QA.
- After QA testing and sign-off, the Release Manager triggers the import to PROD from the CTMS UI.
- CTMS deploys the identical `.mtar` artifact to the PROD sub-account — the same file that passed QA.
Step 1 — Subscribe to CTMS and Set Up Entitlements
This is where everything starts. CTMS needs to be activated in a sub-account before you can use it.
1.1 Assign the CTMS Entitlement
- Log in to SAP BTP Cockpit (https://account.hana.ondemand.com).
- Navigate to your Global Account and click Entitlements → Entity Assignments.
- Select the sub-account where you want to host CTMS (your dedicated CTMS sub-account is recommended).
- Click Configure Entitlements → Add Service Plans.
- Search for Cloud Transport Management and add the standard plan.
- Save your changes.
1.2 Subscribe to CTMS
- Go to your CTMS sub-account.
- Navigate to Services → Service Marketplace.
- Search for Cloud Transport Management and click on it.
- Click Create (subscription). Choose the standard application plan.
- After a moment, the subscription status will show Subscribed.
1.3 Assign Roles to Your User
- In your CTMS sub-account, go to Security → Users.
- Click on your user (or the user who will manage transports).
- Click the three-dot menu and choose Assign Role Collection.
- Assign the following roles:
- Administrator — For setting up the transport landscape.
- LandscapeOperator — For managing nodes and routes.
- ImportOperator — For triggering imports (can be a separate Release Manager user).
- Click Assign Role Collection to save.
1.4 Create a CTMS Service Instance and Service Key
The service instance is what your CI/CD pipeline will authenticate against when uploading artifacts.
- In your CTMS sub-account, go to Services → Instances and Subscriptions.
- Click Create under Instances.
- Select Cloud Transport Management, choose the standard plan (instance type).
- Give it a meaningful name like `ctms-instance`.
- Complete the creation. Then click on the instance name.
- Click Create Service Key. Name it something like `sk-ctms-cicd`.
- Open the service key and copy the JSON — you will need the `clientid`, `clientsecret`, `url`, and `uri` values for your CI/CD pipeline configuration.
🔐 Security Tip: Never commit your CTMS service key JSON to Git. Store it as a credential in your CI/CD pipeline configuration. The SAP CI/CD Service has a built-in Credentials store for exactly this purpose. |
Step 2 — Configure the Transport Landscape
The transport landscape is the map of your environments in CTMS. It defines where artifacts can flow and in what direction. Think of it like the tracks in a railway system — you can only go where the tracks allow.
2.1 Open the CTMS Application
- In your CTMS sub-account, go to Instances and Subscriptions.
- Under Subscriptions, click on Cloud Transport Management to open the CTMS UI.
- If you see an authorization error on first login, log out and log back in — this is a known first-login behavior.
2.2 Create Transport Nodes Using the Landscape Wizard
- In the CTMS UI, click Transport Landscapes → Landscape Wizard.
- Select Three-Node Landscape (Dev → QA → Prod).
- For each node, fill in the details as described below.
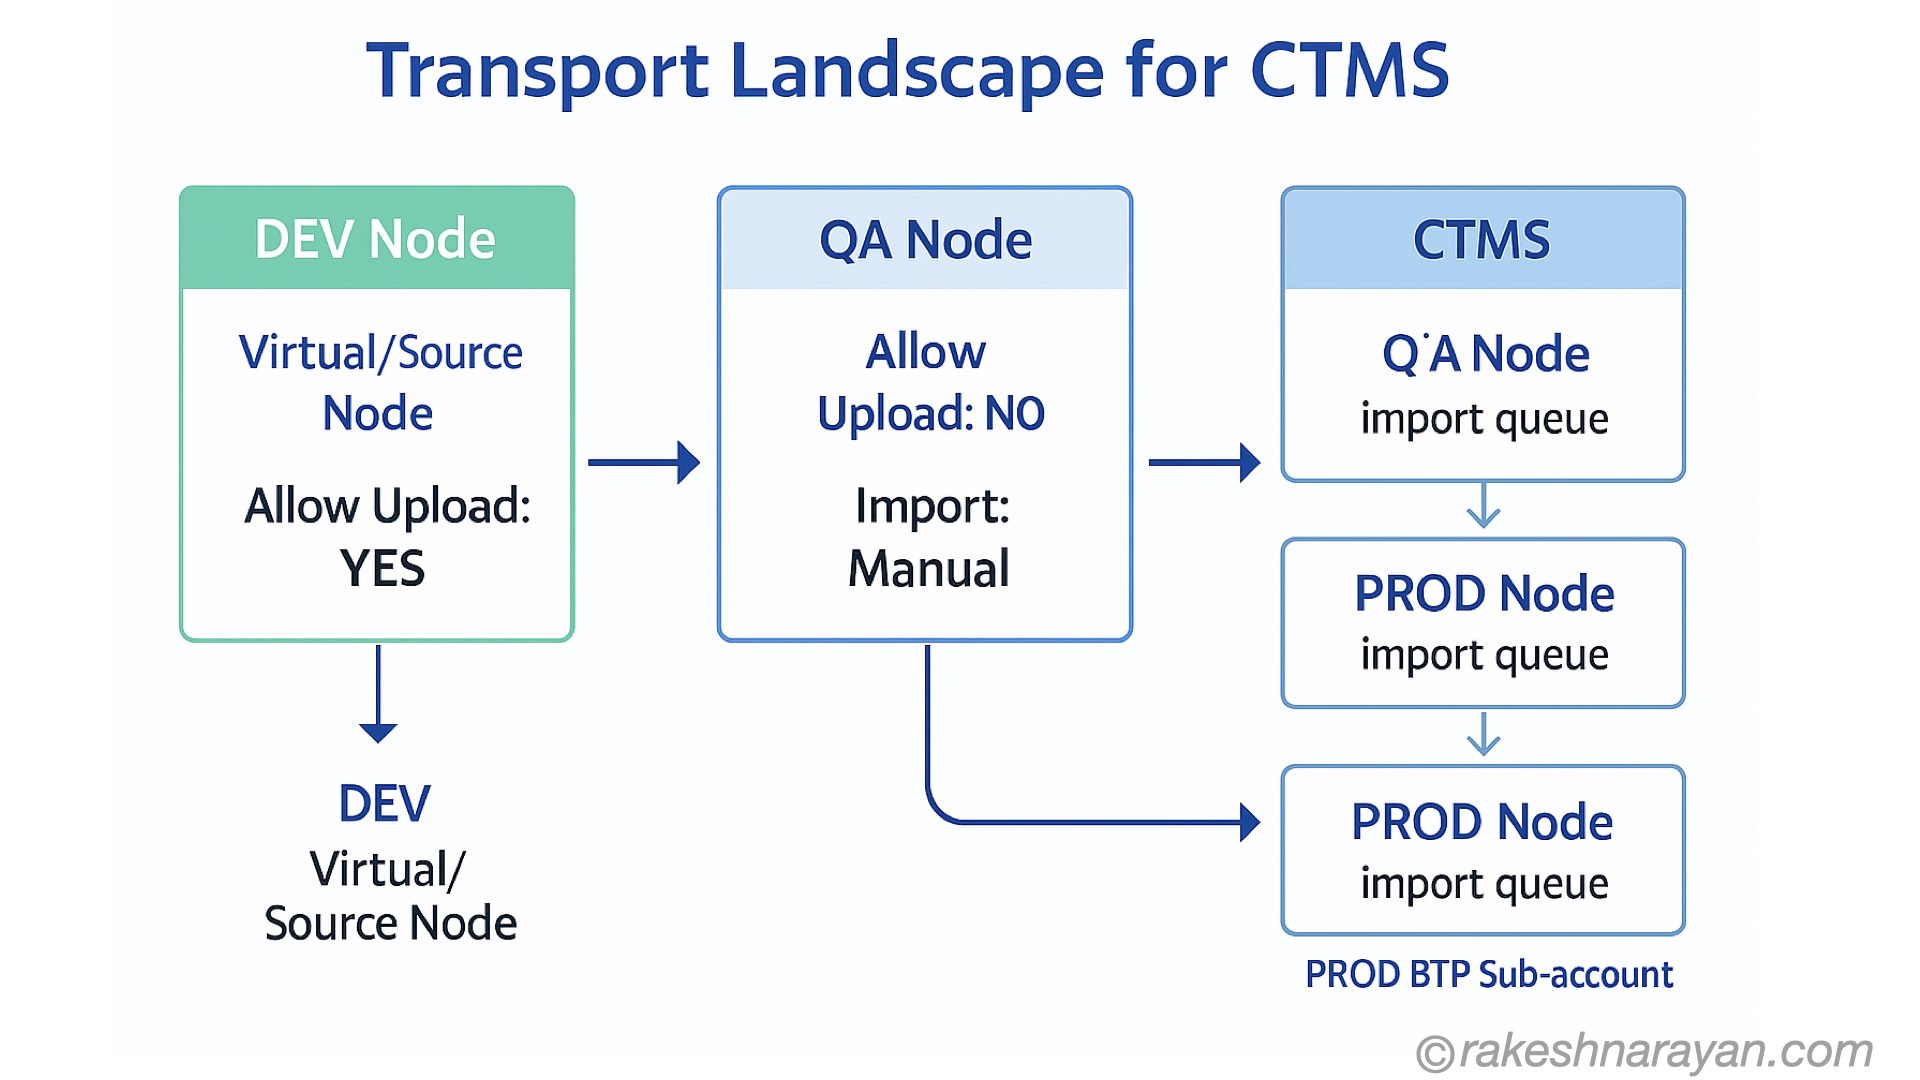
2.3 DEV Node Configuration
- Name: `DEV` (use your naming convention, e.g., `APP-DEV`)
- Description: Development environment node
- Allow Upload: ✅ Check this — the CI/CD pipeline uploads to this node
- Forward Mode: Auto (the artifact automatically moves to the next node’s queue after upload)
- Content Type: Leave blank (or set to Application Content)
- Destination: Leave blank for DEV — DEV is usually a virtual/source node with no actual deployment target
💡 DEV Node as Virtual Node: In many setups (especially when CI/CD deploys directly to DEV), the DEV node in CTMS is kept as a 'dummy' or virtual node. The CI/CD pipeline deploys to DEV directly AND uploads the MTAR to the QA node. This avoids double-deploying to DEV through CTMS. |
2.4 QA Node Configuration
- Name: `QA` (e.g., `APP-QA`)
- Allow Upload: ❌ Uncheck — only DEV node accepts uploads
- Forward Mode: Manual — a human approves before forwarding to PROD
- Content Type: Application Content
- Destination: `DEST-QA` — you will create this destination in the next step
2.5 PROD Node Configuration
- Name: `PROD` (e.g., `APP-PROD`)
- Allow Upload: ❌ Uncheck
- Forward Mode: Manual
- Content Type: Application Content
- Destination: `DEST-PROD` — you will create this in the next step
2.6 Create Transport Routes
- After creating the nodes, click Transport Routes → Create.
- Create Route 1: Source = `DEV`, Target = `QA`, Name = `DEV-to-QA`
- Create Route 2: Source = `QA`, Target = `PROD`, Name = `QA-to-PROD`
- Click Landscape Visualization to verify the nodes and routes appear correctly as a flow diagram.
Step 3 — Create BTP Destinations for CTMS Deployment
Destinations are how CTMS knows where to push the MTAR when it imports to QA or PROD. Each target sub-account needs a destination entry in the CTMS sub-account.
3.1 Find the Deploy Service URL for Each Sub-account
CTMS uses the BTP Cloud Foundry Deploy Service to push MTA archives. You need the deploy service URL for each target environment.
The URL follows this pattern:
https://deploy-service.cf.
Example:
https://deploy-service.cf.eu10.hana.ondemand.com/slprot/my-org-qa/my-space-qa/slp
To find your org name and space name:
- Log in to BTP Cockpit, go to your QA sub-account.
- Click Cloud Foundry → Spaces to see your space name.
- The org name is visible in the sub-account Overview page.
3.2 Create a Technical User for Deployment
CTMS needs credentials to authenticate against the Cloud Foundry deploy service in each target sub-account. Use a technical/service user — never a personal user account.
- Create a dedicated technical user in your Identity Authentication Service (IAS) tenant.
- Set a custom password policy with a non-expiring password to avoid deployment failures.
- Assign this user the Space Developer role in the QA and PROD Cloud Foundry spaces.
- Also assign the CF Org Member role at the organization level.
3.3 Create the QA Destination
- In your CTMS sub-account, go to Connectivity → Destinations.
- Click New Destination and fill in:
- Name: `DEST-QA`
- Type: HTTP
- URL: The deploy service URL for your QA space (from Step 3.1)
- Proxy Type: Internet
- Authentication: BasicAuthentication
- User: Technical user email
- Password: Technical user password
- Add the following Additional Properties:
- cloudfoundry.origin: Your IAS origin key (find this in your sub-account’s Trust Configuration)
- Click Check Connection — you should see `Connection to ‘DEST-QA’ established`.
3.4 Create the PROD Destination
Repeat the same process for PROD:
- Create a new destination named `DEST-PROD`.
- Use the deploy service URL for your PROD Cloud Foundry space.
- Use the same technical user credentials (or a separate PROD-only technical user for tighter security).
- Test the connection.
3.5 Link Destinations to Transport Nodes
- Go back to the CTMS UI → Transport Nodes.
- Edit the QA node and set the Destination field to `DEST-QA`.
- Edit the PROD node and set the Destination field to `DEST-PROD`.
- Save both nodes.
Step 4 — Prepare Your Fiori Project for CTMS
Before the CI/CD pipeline can do its job, your Fiori project needs to be in the right shape. Most importantly, it must be a valid MTA project.
4.1 Verify Your mta.yaml
Open your project in VS Code or BAS and check the `mta.yaml`. A typical Fiori MTA looks something like this:
ID: my-fiori-app
_schema-version: ‘3.1’
version: 0.0.1
modules:
- name: my-fiori-app-deployer
type: com.sap.application.content
path: .
requires:
- name: my-fiori-app-html5-repo-host
parameters:
content-target: true
build-parameters:
build-result: resources
requires:
- artifacts:
- my-fiori-app.zip
name: my-fiori-app
target-path: resources/
- name: my-fiori-app
type: html5
path: .
build-parameters:
build-result: dist
builder: custom
commands:
- npm install
- npm run build:cf
supported-platforms: []
resources:
- name: my-fiori-app-html5-repo-host
type: org.cloudfoundry.managed-service
parameters:
service: html5-apps-repo
service-plan: app-host
🔑 Key Check: Make sure the `type: html5` module is present and that your `package.json` has the `build:cf` script defined. The CI/CD pipeline will call this during the build stage. |
4.2 Add .pipe Configuration (Optional but Recommended)
If you are using SAP CI/CD Service with the job editor (the recommended approach for most teams), you do not need an extra config file — everything is set in the UI. However, if you prefer YAML-based config (source repository method), add a `.pipeline/config.yml` at the root of your project. This is covered in Step 5.
4.3 Ensure Your Project Builds Locally
Before setting up CI/CD, verify the build works manually:
Install MBT globally if not already installed
npm install -g mbt
Build the MTAR from your project root
mbt build
This creates a file like:
mta_archives/my-fiori-app_0.0.1.mtar
If this fails locally, fix it before moving on. CI/CD will fail for the same reasons.
Step 5 — Set Up the SAP CI/CD Service
SAP Continuous Integration and Delivery (CI/CD) Service is SAP’s hosted pipeline service, built on top of Project Piper. It has native CTMS integration, making it the easiest way to connect your Git repository to CTMS.
5.1 Subscribe to SAP CI/CD Service
- In your DEV sub-account (or a DevOps-specific sub-account), go to Services → Service Marketplace.
- Search for Continuous Integration & Delivery and subscribe with the standard plan.
- Assign the CICD Service Administrator role collection to your user under Security → Users.
- Open the CI/CD Service from Instances and Subscriptions.
5.2 Add Credentials
The CI/CD pipeline needs credentials for three things: your Git repo, your DEV CF environment, and your CTMS service instance.
Git Repository Credential
- In the CI/CD UI, go to the Credentials tab. Click the + button.
- Name: `git-cred` (or similar)
- Type: Basic Authentication (use a Personal Access Token for GitHub/GitLab — not your password)
- Username: your Git username
- Password: your Personal Access Token
CF Platform Credential (for DEV deployment)
- Add another credential. Name: `cf-dev-cred`
- Type: Basic Authentication
- Username: your BTP user email
- Password: your BTP password (or use a technical user)
CTMS Service Key Credential
- Add a credential. Name: `ctms-cred`
- Type: Service Key
- Paste the entire JSON from the CTMS service key you created in Step 1.4.
🔒 Best Practice: Use a technical/service user for the CF platform credential — not your personal BTP login. Personal passwords expire and change; a dedicated service user is more stable. |
5.3 Add Your Repository
- Go to the Repositories tab. Click +.
- Enter your Git repository URL (HTTPS format).
- Select your Git credential (`git-cred`).
- Leave the webhook creation toggle on — this generates a webhook URL to paste in GitHub/GitLab.
- Click Add.
- Copy the webhook URL shown and add it to your Git repository’s webhook settings (under Settings → Webhooks in GitHub). Select the Push event trigger.
5.4 Create a CI/CD Job
- Go to the Jobs tab. Click +.
- Fill in the General Information:
- Job Name: `fiori-app-ctms-deploy`
- Repository: Select your repository
- Branch: `main` (or your release branch)
- Pipeline: SAP Fiori in the Cloud Foundry Environment
- Configure the Build stage:
- Enable Build
- MTA Build Tool version: latest available
- Configure the Deploy to DEV stage (Optional but recommended for immediate DEV feedback):
- Enable deployment to CF
- API Endpoint: your DEV CF API endpoint (e.g., `https://api.cf.eu10.hana.ondemand.com\`)
- CF Organization: your DEV org name
- CF Space: your DEV space name
- Credential: `cf-dev-cred`
- Configure the Upload to CTMS stage (this is the key integration):
- Enable Upload to Cloud Transport Management
- Node Name: `DEV` (the name you gave your DEV transport node in CTMS)
- Service Key: `ctms-cred`
- Change Description: Optionally add a description like `Automated build from CI/CD`
- Click Create to save the job.
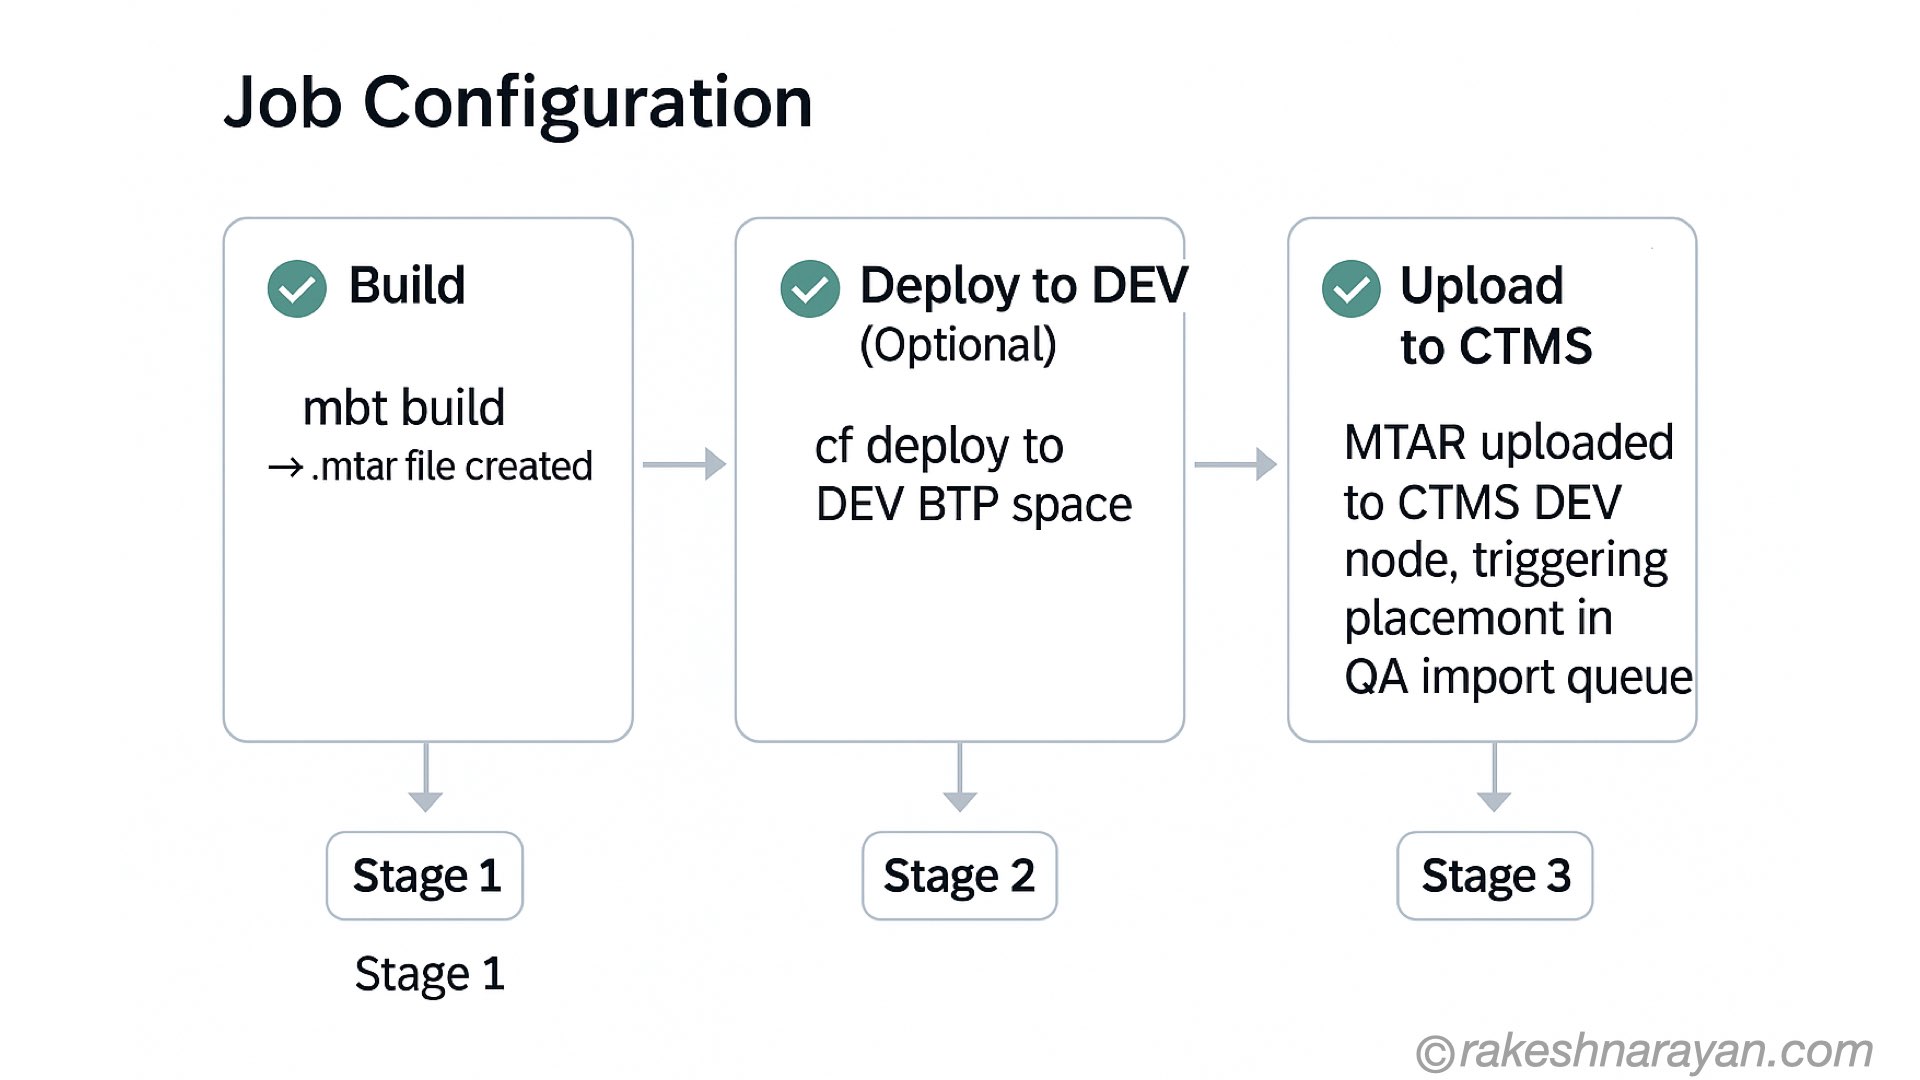
5.5 Test the Pipeline
- Push a small, harmless commit to your `main` branch (even a README update).
- Switch to the CI/CD UI Jobs tab and watch the job run in real time.
- All three stages should complete with green checkmarks.
- Log in to the CTMS UI and check the QA Node → Import Queue — your MTAR should appear there.
🚀 Success Check: If you see an entry in the CTMS QA import queue with your application name and the build timestamp, your CI/CD to CTMS integration is working correctly. Congratulations — the hard part is done! |
Step 6 — Managing Transports in CTMS (The Release Manager Workflow)
With the automation in place, the Release Manager’s job becomes about governance — reviewing what is in the queue and deciding when to promote it. Here is how that works.
6.1 Reviewing the Import Queue
- Log in to the CTMS UI.
- Click Transport Nodes → QA Node.
- You will see a list of transport requests in the Import Queue.
- Each entry shows: the transport ID, description, upload date, size, and linked CI/CD job details.
- Click on a transport to see its details — which artifact, which version, what change description.
6.2 Importing to QA
- Select one or more transports in the QA import queue.
- Click Import Selected (or Import All if you want everything).
- CTMS will call the `DEST-QA` destination and run `cf deploy` of the MTAR to your QA CF space.
- Monitor the import log — CTMS shows a detailed log of the deployment process.
- Wait for the status to change to Succeeded.
- Verify the app in your QA Fiori Launchpad.
6.3 Promoting to PROD
After QA testing and sign-off, the same transport moves to the PROD queue.
- In the CTMS UI, go to the QA Node and find the successfully imported transport.
- Click Forward — this moves the transport to the PROD Node’s Import Queue.
- Go to Transport Nodes → PROD Node → Import Queue.
- Verify the correct transport is there. Click Import Selected.
- CTMS deploys the exact same MTAR that was tested in QA to your PROD CF space.
✅ Same Artifact Guarantee: This is one of CTMS's most important features — the identical .mtar file that passed QA is what gets deployed to PROD. There is no rebuild, no possibility of source code drift between environments. |
6.4 Checking the Audit Log
CTMS automatically maintains a complete audit log. To review it:
- In the CTMS UI, go to Transport Actions or Transport Requests.
- You can filter by date, node, status, or user.
- Each entry shows: who triggered the import, when, which transport, success/failure, and deployment logs.
- This log is invaluable for compliance reviews and incident investigations.
Step 7 — MTA Extension Descriptors (Advanced)
In real enterprise landscapes, your DEV, QA, and PROD environments often have different configuration values — different backend URLs, different service plan sizes, different feature flags. MTA Extension Descriptors solve this elegantly without changing the core `mta.yaml`.
What is an MTA Extension Descriptor?
An extension descriptor is a separate `.mtaext` YAML file that overrides specific parameters in the main `mta.yaml` for a specific environment. Think of it as an environment-specific patch on top of the base config.
qa.mtaext - Extension descriptor for QA environment
_schema-version: ‘3.1’
ID: my-fiori-app-qa
extends: my-fiori-app
modules:
- name: my-fiori-app
parameters:
env:
BACKEND_URL: https://my-backend-qa.example.com
resources:
- name: my-fiori-app-html5-repo-host
parameters:
service-plan: app-host-qa
Uploading Extension Descriptors to CTMS
- Create your extension descriptor files (`qa.mtaext`, `prod.mtaext`) and commit them to your Git repo.
- In the CI/CD job configuration, under the Upload to CTMS stage, there is an option to include MTA Extension Descriptors.
- Specify the path to each `.mtaext` file for the corresponding CTMS node.
- CTMS stores these alongside the MTAR and applies them automatically when importing to that node.
Troubleshooting Common Issues
Issue | Solution |
CI/CD pipeline fails at Build stage | Verify mta.yaml syntax, ensure all npm scripts exist in package.json, confirm MBT is correctly configured in the job. |
'Authorization missing' error when opening CTMS | Log out of CTMS, clear browser cache, and log back in. If it persists, verify your role collection assignment includes the Administrator role. |
'Check Connection' fails on Destination | Verify the deploy service URL format, confirm the technical user has Space Developer role, check that the IAS origin key is correctly set. |
Transport appears in queue but import fails | Review the import log in CTMS UI for the specific CF error. Common causes: service quota exceeded, missing entitlement in target sub-account, wrong space name in destination URL. |
CI/CD webhook not triggering the job | Verify the webhook URL in GitHub/GitLab is correct and active. Check that the webhook sends push events. Look at the Webhooks delivery log in GitHub for errors. |
CTMS shows 'Node not found' error | Verify the Node Name in CI/CD job matches exactly (case-sensitive) with the node name in CTMS. |
MTA Extension Descriptor not being applied | Ensure the .mtaext file path in CI/CD config is relative to the project root and the file is committed to your repository. |
Best Practices for Production-Grade CTMS Deployments
Naming Conventions
- Use consistent, descriptive names for nodes: `
-DEV`, ` -QA`, ` -PROD`. - For transport routes, use: `
-DEV-TO-QA`, ` -QA-TO-PROD`. - Service keys and credentials should reflect their purpose: `sk-ctms-cicd-prod`.
Branching Strategy
- Trigger CI/CD only from protected branches (`main`, `release/*`).
- Use feature branches for development work — only merge to `main` when the feature is ready for QA.
- Consider using semantic versioning in your `mta.yaml` version field — it makes CTMS transport history much easier to read.
Role Separation
- Developers should only have: Git push access, CI/CD job monitoring.
- Release Managers should have: CTMS ImportOperator role, but no direct CF deploy access to PROD.
- Admins should have: Full CTMS admin, landscape configuration rights.
Monitoring and Alerting
- Set up email notifications in SAP Cloud ALM or your monitoring tool for failed imports.
- Review the CTMS transport log weekly during initial rollout.
- Integrate CTMS with SAP Cloud ALM for end-to-end change management visibility (recommended for enterprise).
Frequently Asked Questions (FAQ)
Q1. Do I need to stop deploying from VS Code or BAS immediately? |
Not immediately — you can run both in parallel during transition. However, once CTMS is fully set up and tested, you should restrict direct CF deploy access to production to enforce the CTMS workflow. Keep direct deploy access only for DEV during development iterations. |
Q2. Can CTMS be used with GitHub Actions or Azure DevOps instead of SAP CI/CD Service? |
Absolutely. CTMS has public REST APIs and also works with Project Piper step libraries. You can trigger the CTMS upload from any CI/CD tool using the cloudTransportManagementUpload Piper step or by calling the CTMS REST API directly with your service key credentials. |
Q3. What happens if a deployment to PROD fails midway through? |
CTMS logs the failure with a detailed error message. The transport remains in the import queue with a Failed status. You can retry the import after fixing the root cause — the same MTAR artifact is reused, so there is no need to rebuild or re-trigger the CI/CD pipeline. |
Q4. Can I transport to sub-accounts in a different global account? |
Yes — CTMS supports cross-global account transport. You just need to ensure the target sub-account is reachable via a BTP Destination. The deploy service URL-based authentication works across global account boundaries. |
Q5. How much does CTMS cost? |
CTMS is charged based on data uploaded — approximately 18 EUR per 1 GB of uploaded artifact data per month (as of 2025/2026 pricing). Imports are not charged separately regardless of how many times you import. A Free Tier plan is available for evaluation with a 2 GB artifact quota and 7-day artifact retention. |
Q6. Can I use CTMS with SAP Build Apps or SAP Build Work Zone? |
Yes. CTMS supports a wide range of SAP BTP content types including SAP Build Apps (MTA-based), SAP Build Work Zone (formerly Launchpad Service), SAP Integration Suite iFlows, and more — not just custom Fiori apps. |
Q7. What is the difference between Manual and Auto Forward Mode in CTMS nodes? |
In Auto mode, as soon as a transport arrives in a node's import queue, it is automatically forwarded to the next node without any human action. In Manual mode (recommended for PROD), a designated release manager must explicitly trigger the import. Always use Manual for production. |
Q8. Do I need SAP Cloud ALM for CTMS to work? |
No — CTMS works independently without SAP Cloud ALM. However, integrating with Cloud ALM gives you end-to-end change management visibility, linking transports to change requests and providing a unified dashboard across your SAP landscape. |
Q9. Can I roll back a deployment using CTMS? |
CTMS itself does not have a one-click rollback button. To roll back, you would need to re-import a previous transport (if still within the retention period — 30 days on standard plan). For longer-term rollback capability, maintain versioned MTAR artifacts in an artifact repository like Nexus or GitHub Releases. |
Q10. My team uses BAS (Business Application Studio) — does anything change? |
The development workflow in BAS remains unchanged — you still build and test in your DEV sub-account. The change is that instead of doing 'Deploy MTA Archive' directly from BAS, you push your code to Git and let the CI/CD pipeline handle the rest. The CTMS transport flow takes over from there. |
Wrapping Up
Migrating from manual CF-based deployments to a CTMS-integrated CI/CD pipeline is one of the most impactful DevOps improvements you can make for an SAP BTP project. Yes, the initial setup takes time — but the payoff is enormous: every deployment is traceable, every release is controlled, and your production environment only ever sees code that has been properly tested and approved.
To summarize what we built in this guide:
- Activated CTMS in a dedicated BTP sub-account with proper role assignments.
- Configured a three-node transport landscape (DEV → QA → PROD) with routes.
- Set up BTP Destinations with technical users for automated deployment to QA and PROD.
- Prepared the Fiori MTA project and verified it builds correctly.
- Configured the SAP CI/CD Service with credentials and a pipeline job that builds, deploys to DEV, and uploads to CTMS.
- Established the Release Manager workflow for promoting transports through the pipeline.
The team has done the right thing adopting CTMS. This guide gives you the roadmap to get there. Take it one step at a time, verify each piece before moving forward, and do not hesitate to lean on the SAP Community and SAP Help Portal documentation when you hit a snag.
📚 Useful References: SAP Help Portal — Cloud Transport Management: help.sap.com/docs/cloud-transport-management | Project Piper TMS Integration: project-piper.io/scenarios/TMS_Extension | SAP Community DevOps: community.sap.com/topics/devops | SAP BTP Discovery Center: discovery-center.cloud.sap |