OAuth 2.0 and OpenID Connect — How Modern Login Actually Works
You see it everywhere. ‘Sign in with Google.’ ‘Continue with Microsoft.’ ‘Connect your Slack account.’ Behind every one of these is OAuth 2.0 — and in most cases, OpenID Connect sitting on top of it.
These are not just login buttons. They are a security framework that solves a real problem: how do you let an application access your data on another service, without giving it your password?
This post explains how it all works — the concepts, the flows, the tokens — clearly and without the specification language.
🔗 Related posts on this site
API Security Essentials — covers how tokens are used in API calls, rate limiting and the OWASP Top 10.
How HTTPS Works — the TLS layer that all OAuth traffic depends on.
REST API Design Principles — how the APIs that OAuth protects are designed.
The problem OAuth solves
Before OAuth existed, the only way to let an app access your data on another service was to give it your username and password. The app would log in as you. This was terrible for obvious reasons — the app had full access to your account, forever, and you had no way to revoke it without changing your password.
OAuth solves this by introducing the concept of delegated access. Instead of sharing your credentials, you authorise the app to access specific things on your behalf — and the service issues a token for that purpose. The app uses the token, not your password.
| Before OAuth | With OAuth 2.0 |
|---|---|
| App receives your password | App receives a token — never sees your password |
| Full access to your account | Access limited to specific scopes you approved |
| No way to revoke without changing password | Token can be revoked at any time without changing password |
| App stores your credentials | App stores only a token — lower risk if app is compromised |
The four roles in OAuth 2.0
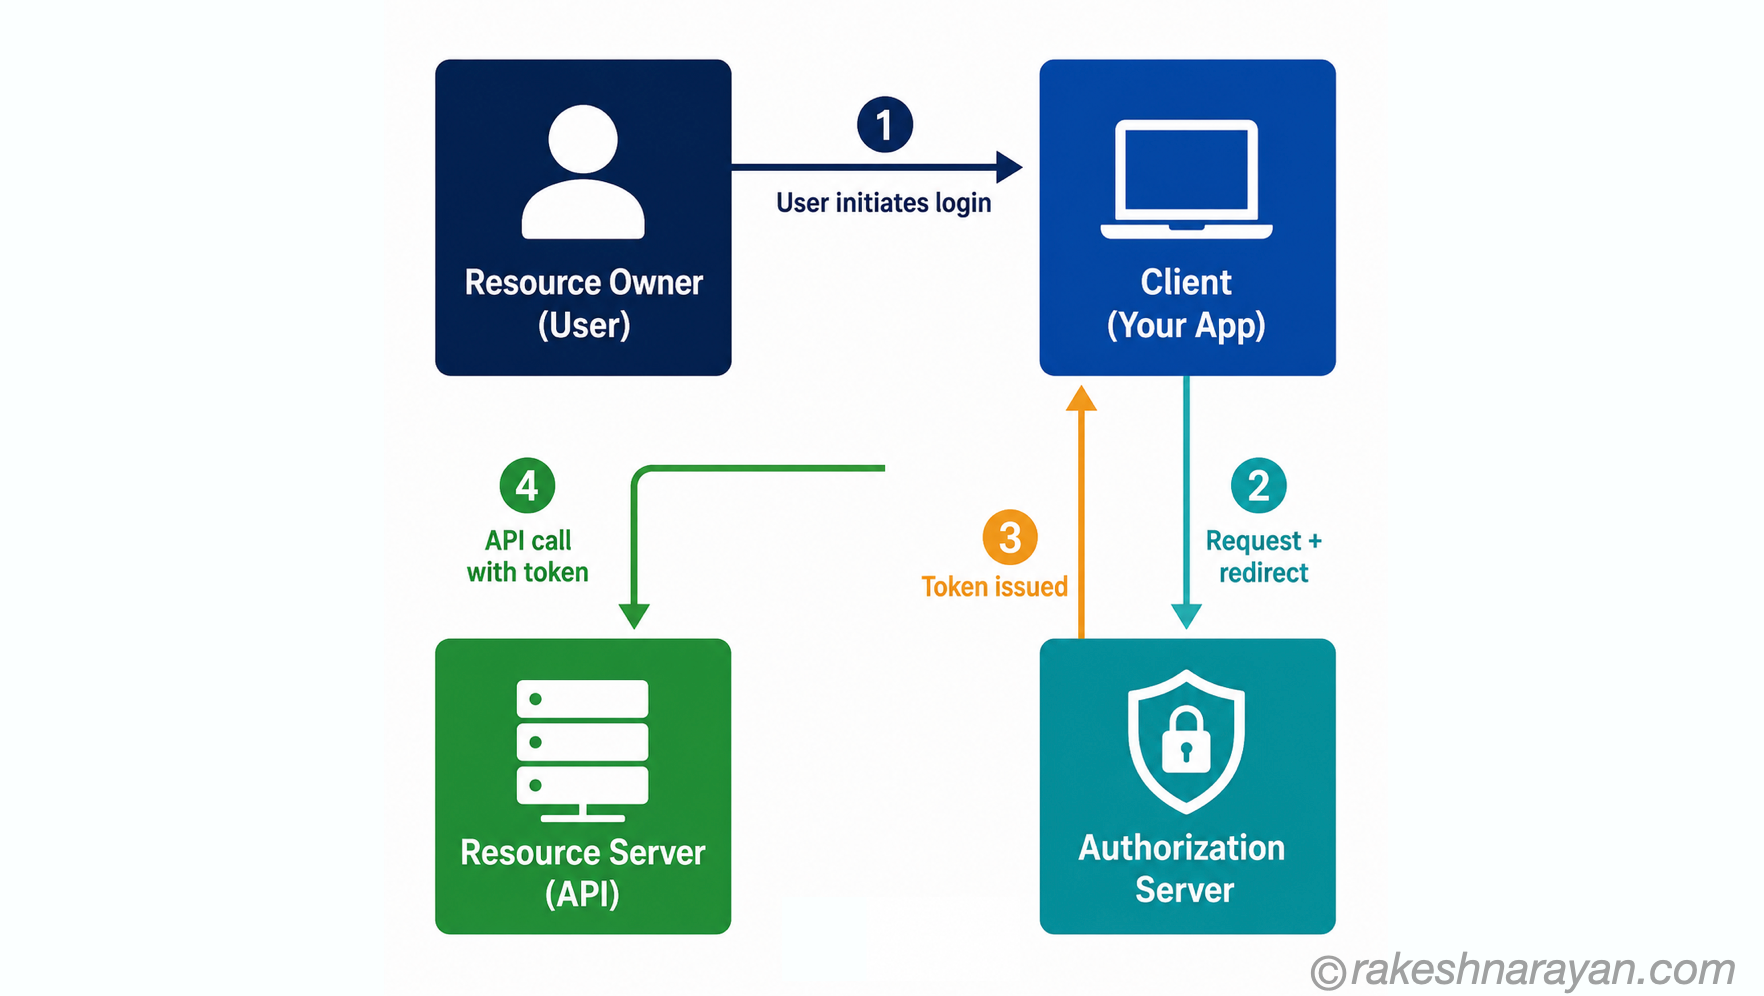
Every OAuth flow involves four parties. Understanding these roles is the key to understanding any OAuth diagram.
| Role | Who it is | Real-world example |
|---|---|---|
| Resource Owner | The user who owns the data and grants access | You — the person clicking ‘Allow’ |
| Client | The application requesting access | A third-party app wanting to read your Google Calendar |
| Authorization Server | The service that issues tokens after the user approves | Google’s login and consent system |
| Resource Server | The API that holds the protected data | Google Calendar API |
OAuth 2.0 grant types — the four flows
OAuth 2.0 defines several ways to obtain a token, called grant types. Each one is designed for a different scenario. You do not need all of them — but you need to know which one fits your situation.
| Grant type | Designed for | Still recommended in 2026 |
|---|---|---|
| Authorization Code + PKCE | Web apps and mobile apps where a user is present | Yes — the standard for user-facing apps |
| Client Credentials | Machine-to-machine — no user involved | Yes — standard for server-to-server API calls |
| Device Code | Devices with no browser (smart TVs, CLI tools) | Yes |
| Implicit | Old single-page apps — token returned directly in URL | No — deprecated, replaced by Auth Code + PKCE |
| Resource Owner Password | App collects user’s credentials directly | No — avoid, defeats the purpose of OAuth |
Authorization Code Flow with PKCE — the main one
This is the flow behind every ‘Sign in with Google’ button. It is used whenever a real user is logging in via a browser or mobile app. PKCE (Proof Key for Code Exchange, pronounced ‘pixy’) is a security extension that prevents interception attacks — it is required for all public clients in 2026.
| 1 User clicks login | 2 Redirect to Auth Server | 3 User logs in + approves | 4 Auth code returned | 5 Code exchanged for token | 6 App calls API with token |
|---|
| Step | What happens |
|---|---|
| 1. User clicks login | The app redirects the user’s browser to the Authorization Server with a request specifying scopes and a code challenge (PKCE) |
| 2. User authenticates | The user logs in at the Authorization Server — the app never sees the credentials |
| 3. User approves | The Authorization Server shows a consent screen listing what access the app is requesting |
| 4. Auth code returned | After approval, the browser is redirected back to the app with a short-lived authorization code in the URL |
| 5. Code exchanged | The app’s server exchanges the code (plus the PKCE verifier) for an access token — this happens server-side, not in the browser |
| 6. Token used | The app uses the access token to call the protected API on the user’s behalf |
💡 Why the code exchange step?
The authorization code is short-lived and useless on its own — it must be exchanged for a token server-side. This means the actual token never appears in browser history, logs or the URL bar. If the code is intercepted, it cannot be used without the PKCE code verifier that only the legitimate app holds.
Client Credentials Flow — machine to machine
This is the flow for system-to-system calls where no user is involved. A backend service authenticates with the Authorization Server using its own client ID and secret, and gets a token to call another API.
This is the most common flow in SAP BTP integrations — a CPI flow authenticating to call an external API, or a BTP service calling another BTP service.
| 1 App sends client ID + secret | 2 Authorization Server validates | 3 Access token issued | 4 App calls API with token |
|---|
Tokens — what they are and what they do
| Token type | What it is | Lifetime | Used for |
|---|---|---|---|
| Access Token | Credential that proves the app is authorised to call the API | Short — minutes to hours | Sent with every API request in the Authorization header |
| Refresh Token | Credential used to get a new access token when the current one expires | Long — hours to days | Sent to the Authorization Server to get a fresh access token — never sent to the API |
| ID Token | OpenID Connect only — contains identity claims about the user | Short | Read by the app to know who the user is — not sent to the API |
What a JWT actually looks like
Most access tokens and all ID tokens in modern OAuth systems are JWTs — JSON Web Tokens. A JWT is a Base64-encoded string with three dot-separated parts: header, payload and signature.
eyJhbGciOiJSUzI1NiIsInR5cCI6IkpXVCJ9
.
eyJzdWIiOiJ1c2VyXzEyMyIsIm5hbWUiOiJSYWtlc2ggTmFyYXlh…
.
SflKxwRJSMeKKF2QT4fwpMeJf36POk6yJV_adQssw5c
| Part | Contains | Example content |
|---|---|---|
| Header | Algorithm used to sign the token | { “alg”: “RS256”, “typ”: “JWT” } |
| Payload | Claims — user ID, roles, expiry, issuer | { “sub”: “user_123”, “exp”: 1700003600, “scope”: “read:orders” } |
| Signature | Cryptographic proof the token has not been tampered with | Verified using the Authorization Server’s public key |
💡 The server does not look up a session
Because the JWT payload is self-contained and signed, the Resource Server (API) can verify and read the token without making a database call. It checks the signature using the Authorization Server’s public key, confirms the token has not expired, and reads the claims directly. This is why JWT-based auth scales well across distributed systems.
OpenID Connect — adding identity to OAuth
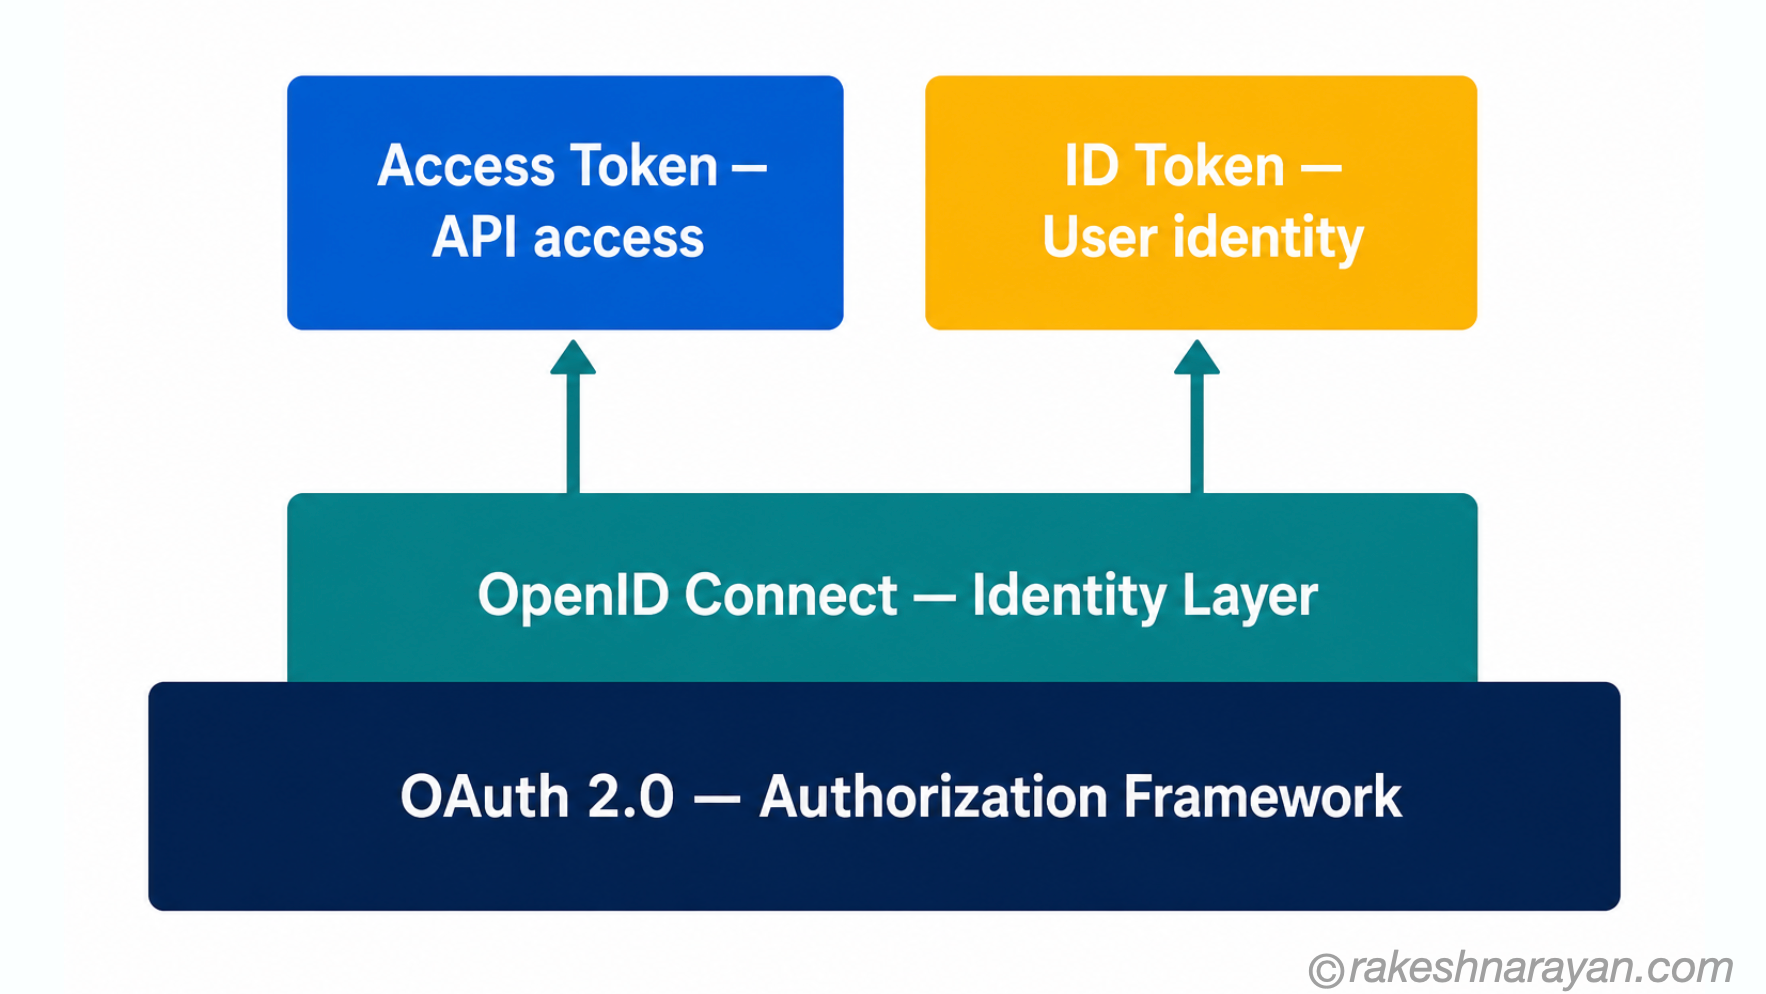
OAuth 2.0 handles authorisation — what an app is allowed to do. It does not handle authentication — who the user actually is. That gap is what OpenID Connect fills.
OpenID Connect (OIDC) is a thin layer built directly on top of OAuth 2.0. It uses the same flows but adds one new token — the ID Token — and a standard set of claims about the user.
| OAuth 2.0 | OpenID Connect | |
|---|---|---|
| Purpose | Authorisation — grants access to resources | Authentication — verifies who the user is |
| Token produced | Access token + optional refresh token | Access token + ID token + optional refresh token |
| What it answers | Is this app allowed to do this? | Who is this user? Is this actually them? |
| User info | Not defined | Standard claims: sub, name, email, picture |
| Used for | API access, delegated permissions | Login, SSO, identity federation |
The standard OIDC claims
When you use OpenID Connect, the ID Token always contains a standard set of user claims. These are the same regardless of which identity provider you use — Google, Microsoft, Okta, or your own.
| Claim | What it contains |
|---|---|
| sub | Subject — the unique user ID issued by the identity provider. Never changes for that user. |
| iss | Issuer — the URL of the Authorization Server that issued the token |
| aud | Audience — the client ID of the app the token was issued for |
| exp | Expiry — Unix timestamp after which the token is invalid |
| iat | Issued at — Unix timestamp when the token was issued |
| name | User’s full name (if requested and available) |
| User’s email address (if requested and available) | |
| picture | URL of the user’s profile photo (if available) |
Scopes — controlling what is accessible
Scopes are how OAuth defines what the app is asking to access. The user sees them on the consent screen. The token carries them as a claim. The API enforces them.
| Scope | What it grants |
|---|---|
| openid | Required for OpenID Connect — tells the server to issue an ID token |
| profile | Access to basic profile info — name, picture |
| Access to the user’s email address | |
| read:orders | Custom scope — read-only access to orders (defined by the API) |
| write:orders | Custom scope — ability to create or modify orders |
| offline_access | Request a refresh token — needed to access resources when user is not present |
💡 Principle of least privilege
Only request the scopes your application actually needs. Requesting more scopes than necessary makes the consent screen alarming, reduces user trust, and increases the impact if your app or its tokens are compromised. Ask for the minimum — you can always request additional scopes later if needed.
OAuth 2.0 in the SAP context
If you work with SAP, OAuth 2.0 is already central to how everything connects in the cloud.
| SAP scenario | OAuth flow in use |
|---|---|
| User logs into an SAP Fiori app | Authorization Code Flow — user authenticates via SAP IAS or Azure AD |
| CPI flow calls an external REST API | Client Credentials Flow — CPI authenticates with client ID and secret |
| BTP service calls another BTP service | Client Credentials Flow — service-to-service via XSUAA |
| SAP mobile app login | Authorization Code + PKCE — user-facing mobile OAuth flow |
| SSO across SAP and non-SAP apps | OpenID Connect via SAP Identity Authentication Service (IAS) |
Common mistakes to avoid
| Mistake | Why it matters |
|---|---|
| Storing access tokens in localStorage | Accessible to any JavaScript on the page — XSS attack can steal it. Use httpOnly cookies or memory instead. |
| Not validating the token on the server | Never trust a token blindly — always verify signature, expiry, issuer and audience |
| Using the Implicit flow in 2026 | Deprecated and insecure — the access token was returned in the URL fragment. Use Authorization Code + PKCE. |
| Long-lived access tokens | The shorter the better — minimises damage from token theft. Use refresh tokens for long sessions. |
| Ignoring the ‘state’ parameter | The state parameter prevents CSRF attacks in the Authorization Code flow — always use it |
The mental model — all together
| Concept | One-line summary |
|---|---|
| OAuth 2.0 | A framework for delegated authorisation — lets apps access resources without passwords |
| OpenID Connect | An identity layer on top of OAuth — adds authentication and user profile claims |
| Authorization Code + PKCE | The standard flow for user-facing apps — browser redirect, code exchange, token issued server-side |
| Client Credentials | The standard flow for machine-to-machine — client ID + secret, token returned directly |
| Access Token | Short-lived credential sent with every API call — proves the app is authorised |
| Refresh Token | Long-lived credential used to get a new access token — never sent to the API |
| ID Token | OpenID Connect only — identifies who the user is via standard claims like sub and email |
| JWT | The token format — self-contained, signed, verifiable without a database lookup |
| Scopes | Define exactly what the app is allowed to access — request only what you need |
| PKCE | Security extension for Authorization Code flow — prevents interception attacks |
What to take away
OAuth 2.0 is not a login system. It is an authorisation framework. OpenID Connect is what turns it into a login system by adding identity on top.
Once you understand the four roles and the two main flows — Authorization Code for users, Client Credentials for systems — most of what you encounter in the real world starts to make sense. The token format, the scopes, the consent screen — they all follow logically from the problem OAuth was designed to solve.
🔗 Related posts on this site
API Security Essentials — covers how tokens are used in API calls, rate limiting and the OWASP Top 10.
How HTTPS Works — the TLS layer that all OAuth traffic depends on.
REST API Design Principles — how the APIs that OAuth protects are designed.
Published on rakeshnarayan.com — Articles
URL: https://rakeshnarayan.com/articles/oauth2-openid-connect/